WordPress version 3 has an amazing feature which allows us to create custom menus, and integrate them seamlessly into themes. Most themes these days provide us with multiple locations to place such custom-generated menus, which could be easily configured from the back-end, without any prior knowledge of coding. Unlike previous versions of WordPress, these custom menus could be a mixture of pages, categories, or even custom links. With the help of drag-and-drop technique, you can sort menu items, or create multi-level hierarchy without much effort.
WordPress allows us to pick a title or caption for each menu-item to be displayed on the front-end. But, What if you want to display an icon image, instead of just plain caption? What if you want to, for example, display a Home icon, instead of the text “Home”, or Twitter/Facebook icon on your navigation menu?
In this tutorial, we’ll show you how to do this in a few easy steps. This, however, requires playing with a little bit of CSS. A minimal knowledge of CSS would make it easy to understand the rules, but it’s NOT necessary. Also, for the scope of this tutorial, we’ll be using the “Twenty Eleven” theme, which comes pre-installed with the latest version of WordPress. Twenty Eleven provide us with only a single location, just below the header image, to place our custom menu, so we’ll be creating a Main Menu with a Home icon, in the following steps.
Creating a Custom Menu
Navigate to Appearance >> Menus, and enter a name for the menu (any name you prefer), before hitting the “Create Menu” button. After the menu is created, select pages, categories, or custom links to be displayed on the menu. You can sort them in any order you like, by simply dragging them from their old position, and dropping them to a new one.

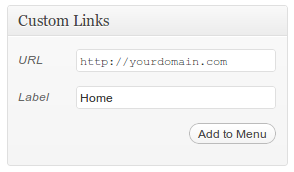
Now, for the Home menu-item, create a custom link with label “Home”, pointing to your domain. Re-arrange the Home menu-item in your menu, and save.
Placing Menu on the Theme
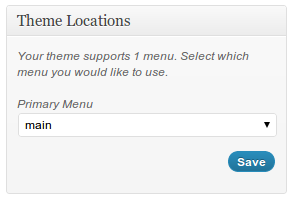
Now, that the menu is ready, you need to place it in the available slot, on your theme. Under the “Theme Locations” section, use the drop-down menu to select the menu you just created, for a particular slot (in case if your theme supports multiple slots), and hit the “Save” button.
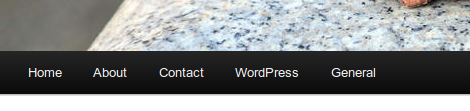
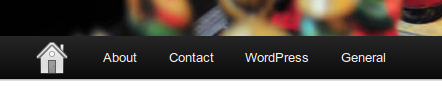
Your menu should look something like this on the front-end.
Finding the ID of Menu-Item
Now that we have created a menu, and placed it on the theme, we need to replace the Home item with an image. But first, we need to find out the ID of the Home menu-item in order to apply CSS rules. Applying CSS to only a particular menu-item would ensure that the rest of the menu items remain unaffected.
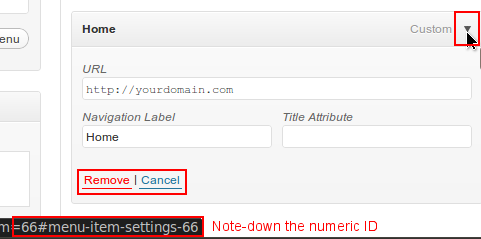
Go back to Appearance >> Menus, and select the menu you just created. Now, hover over the small arrow on the right-hand side of the menu-item, or expand the item and hover over the “Remove” or “Cancel” link. The browser will reveal the ID of that menu-item in it’s status bar, as shown in the image below (66 in this case).
Replacing Text Label with Icon
After finding the ID of the menu-item, which we want to replace with an image, go to Appearance >> Editor, and open the Stylesheet file (style.css in most cases) used by the theme. Usually, WordPress automatically opens the style.css file for you, but some themes support multiple stylesheet files, so you need to make sure that you’ve opened the correct one for editing purpose.
Append the following CSS code at the end of your stylesheet file. Don’t forget to replace the ID used below, with the ID of the menu-item you want to apply the rules to.
#menu-item-66 a {
text-indent: -999em;
width: 50px;
background: url('images/home-icon.png') center center no-repeat !important;
}

#menu-item-66 a:hover {
background: #EFEFEF url('images/home-icon-active.png') center center no-repeat !important;
}
(NOTE: Make sure you specify the path to the images correctly.)
After appending the above rules, click the “Update File” button to save changes. And we’re done!
What we’ve done here is, we moved the label text out of the visible area using the text-indent property, and used the background property to set the icon image instead. This is known as the Phark Method, and is widely used to replace text with images using CSS. There are numerous methods available to do the same, but we’ve chosen this method here because of it’s simplicity.
Scenario 2: Displaying both Icon and Text/Label
In this scenario, we’ll talk about keeping the label text, and displaying an icon image alongside it.
![]()
Navigate to Appearance >> Editor, and open the active stylesheet file of your theme. Append the following CSS, and save changes to the file. Make sure you replace the menu-item ID, and path to the images below.
#menu-item-66 a {
text-indent: 30px;
width: 60px;
background: url('images/home-icon.png') 15% 50% no-repeat;
}
#menu-item-66 a:hover {
background: #EFEFEF url('images/home-icon-active.png') 15% 50% no-repeat !important;
}
What we’re doing here is, pushing the caption a little to the right using the text-indent property, thus, making space for the icon image on it’s left. The background property defines horizontal and vertical positioning values (15% from left, and 50% from top) to adjust the images properly inside the menu-item container.
Let us know if these methods work for you.
This CSS code is what I wanted. Thanks.
I’m trying to figure out how to remove the drop down icon when a menu expands do you know how?