The latest WordPress update 5.6 “Simone” came with a new default theme Twenty Twenty-One, greater layout flexibility, new block patterns, PHP 8.0 (beta), Updates to jQuery, Application password support for the REST API, and Video captioning support. In this article, you’ll learn how to easily add caption and subtitles to videos in WordPress.
WordPress has always aimed towards making its CMS more flexible for its users. Following this, they have added the feature to add captions and subtitles to videos using the Web Video Text Tracks Format (WebVTT) . This feature gives us the ability to add captions and subtitles to videos.
Add captions and subtitles to videos using WebVTT file
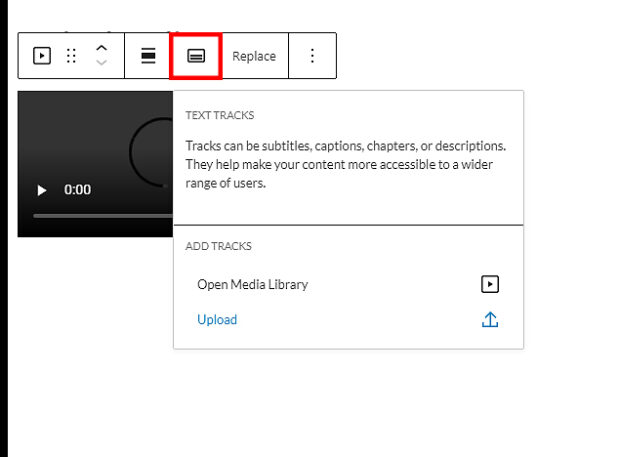
There is an option now in the Gutenberg editor, which allows you to add a Web Video Text Tracks Format (WebVTT) file to a Video Block.
You can click on the Video block and then click on the ‘Text Tracks’ button to attach/upload a VTT file to your video.
What is a WebVTT file?
A WebVTT file is a plain-text document. It uses the (soon to be) W3C specification to mark up external text track resources in connection with the HTML <track> element.
A WebVTT (.vtt) file has a simple code specifying a range of time, i.e., 00:11.000 –> 00:13.000, and the text you want to appear, i.e., <v Roger Bingham>We are in New York City, this will now show as a caption or subtitle during that timeframe.
Here is an example of a WebVTT file that captions an interview:
 WEBVTT

 00:11.000 --> 00:13.000
 <v Roger Bingham>We are in New York City

 00:13.000 --> 00:16.000
 <v Roger Bingham>We’re actually at the Lucern Hotel, just down the street

 00:16.000 --> 00:18.000
 <v Roger Bingham>from the American Museum of Natural History

 00:18.000 --> 00:20.000
 <v Roger Bingham>And with me is Neil deGrasse Tyson

 00:20.000 --> 00:22.000
 <v Roger Bingham>Astrophysicist, Director of the Hayden Planetarium

 00:22.000 --> 00:24.000
 <v Roger Bingham>at the AMNH.

 00:24.000 --> 00:26.000
 <v Roger Bingham>Thank you for walking down here.
 Source - https://www.w3.org
How to create captions and subtitles using a WebVTT file
Here are some different methods using which you can create subtitles/captions using WebVTT file. You can use any method as per your needs.
Method 1: Use Transcription and Closed captioning services
You can use a transcription/closed captioning service to create video captions for you. These services will create a .vtt file by transcribing the audio from your video.
GoTranscript.com and Rev are two of the popular captioning services. However, these sites are not free.
Visit this link to check out the list of some of the free transcription/closed captioning services.
Method 2: Use Online Tools
You can use free online tools like Subtitle Edit Online to create video captions and then save them in .vtt format. It is a simple tool, but it’s free, so it is a little clumsy to use.
Click on this link to get step-by-step instructions on how to use Subtitle Edit Online.
Method 3: Use a text editor like Notepad
You can create a VTT file using Notepad. You can start by writing WEBVTT at the top; after that, you can add the subsequent entries called ‘cues.’ Cues consist of the range of time with your captions or subtitles.
Example:
00:01.000 –> 00:04.000
Welcome to our video.
Use an “arrow”, –> to separate start time & end time. Use colons (:) to separate hours and minutes, and use period (.) to separate minutes and seconds, like this: 00:35.500. Always remember to add hours and seconds, even if it’s a ‘0’.
Note: The instruction given above is for the new time-marker format, which is hh:mm.sss = 00:35.500. If this doesn’t work for you, then you might want to try the old time-marker format: hh:mm:ss.ttt = 00:00:05.330. The ‘ttt’ here stands for thousandths of a second.
After writing the code, when you save the file in the File Name box, write the .vtt filename extension. Use the quotation marks (“) to enclose the whole name: “Myfile.vtt”. Now, select All Files (*.*) in the Save as type box to ensure it is saved with the .vtt extension. In the Encoding box, select UTF-8 to display complex and international characters accurately.

Method 4: Use Conversion tools
If you already have subtitles in any other format, you can use a conversion tool to convert it into a .vtt format and then upload it to your site.
Tip – You can visit https://www.w3.org to learn various codes for creating WEBVTT files in different styles.
So go ahead, use any of these methods to add captions and subtitles to your videos in WordPress. If you have any questions, let us know in the comments below.