![]() Pocket (formerly Read It Later) is a superb tool to save pretty much anything which you are planning to read/view it later when you have some free time. The web is ever expanding and when you surf the web, you can find many interesting articles, videos, images and many such things. You won’t be able to read everything at once, and that’s why you can Pocket it – which means you can save the article and many such things for offline viewing. Once you Pocket it, you can view it in your Android, iPhone, iPad, Kindle Fire or directly via the web browser. Wouldn’t it be great if you can add an option for your visitors so that they can add your content to Pocket directly?
Pocket (formerly Read It Later) is a superb tool to save pretty much anything which you are planning to read/view it later when you have some free time. The web is ever expanding and when you surf the web, you can find many interesting articles, videos, images and many such things. You won’t be able to read everything at once, and that’s why you can Pocket it – which means you can save the article and many such things for offline viewing. Once you Pocket it, you can view it in your Android, iPhone, iPad, Kindle Fire or directly via the web browser. Wouldn’t it be great if you can add an option for your visitors so that they can add your content to Pocket directly?
In this tutorial, you’ll learn how to add Pocket button to WordPress.com blogs and also to self-hosted WordPress sites. Fortunately, the process is very easy and anyone can follow it. So without further ado, let’s start.
Add Pocket Button to WordPress.com
WordPress.com, by default, allows users to add sharing buttons so that visitors can share content across various social networks and services. All you need to need to do is to just enable the sharing options that you’re interested in.
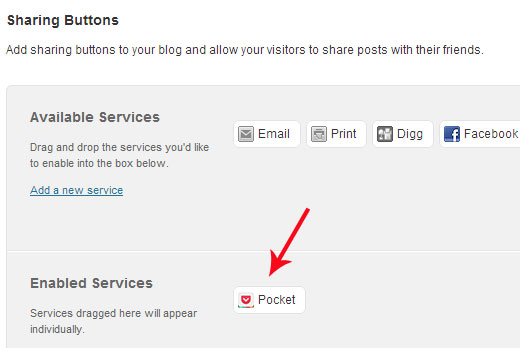
To enable the sharing to Pocket option, go to Settings -> Sharing page from your Dashboard. From here, you can view various sharing buttons. Drag and drop the Pocket button to the “Enabled Services” section.
Below that, you can configure options like button style, sharing label, open links in new window or same window, and display the buttons on front page, posts, pages or media. In most cases, you would like to display the sharing buttons only on Posts, but it really depends on your requirement.
That’s all you need to do. The Pocket button will now be visible in the front-end and upon clicking it, visitors will be able to add the content to their Pocket account.
Add Save to Pocket Button to Self-Hosted WordPress Sites
If you are on a self-hosted site on WordPress, then you can add the Pocket button in two ways:
1. By using Jetpack Plugin: Install and Activate the Jetpack plugin. Once you enable this plugin, you’ll be able to see a new “Sharing” option in Settings. Click on it and then drag and drop the Pocket button to the “Enabled Services” section. Also you can configure various other sharing options from the same page. Once done, don’t forget to click on the Save Changes button.
2. Manually add the Pocket Button Code to your site: You can manually add the code for Pocket Button to your WordPress site. Go to this page, choose a button style (you can also see a preview on the right side) and then copy the code from there. Now you can paste the code to your theme file where you want to place the Pocket button on your site/blog.

You can use any of the above method to add the Pocket button to your WordPress site. This being done, you’ve just added one more convenient way for your visitors so that they can easily save your content to their Pocket.
Also Read: How to Add a Floating Social Bar to WordPress