Many people complain about the in-built functionality of Search in WordPress. Problem is that many times results are shown which are completely not relevant to the search term and to top it all, results are arranged by date (latest first) and not by the relevance of keywords. The situation is really problematic for those who have many posts and want to give better search results to their visitors. That’s why its better to use Google Custom Search Engine to offer better search experience to visitors.
Why Use Google Custom Search Instead of WordPress Default Search?
- Google custom search displays relevant search results, compared to WordPress’s default search.
- Easily customize look and feel of the search box and the results displayed.
- You can also monetize your search results by using Google Adsense program.
- Option to search multiples sites instead of just one site (you choose which sites to search).
- You can take advantage of autocomplete, auto thumbnails, etc features.
- Get detailed insights by using Google Analytics.
Now let’s start the process to integrate Google Custom Search to WordPress. Don’t worry, you don’t need to know coding for doing this.
Creating a Custom Search Engine
First things first. Create a custom search engine from this page. You’ll need to sign-in to your Google account to do this. After signing-in, click on the big Create a Custom Search Engine button.

There are three steps in creating a custom search engine. In the first step, you’ll need to enter a name and description of search engine, which sites to search (you can also add multiple sites in this field) and finally, select an edition which will most likely be “Standard edition” as its free.

In the second step, you can choose or customize a style for Google search results and search box. The default style resembles like the standard Google search results, so you can just select the default style and can also test your search engine from this screen. Enter a search term and you can see a preview of the results. If you’re satisfied with the results then click on Next.

In the third stage, all you need to do is to just copy the Search engine unique ID which is highlighted in the screenshot below. You can also get this ID from the control panel of your search engine.

Installing and Configuring the Plugin
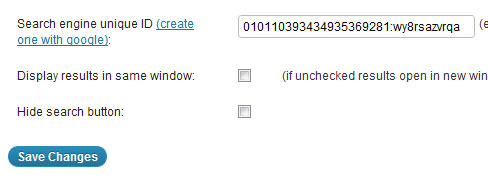
Now its time to download and install Google Custom Search plugin. Activate the plugin and then navigate to Settings > Google Custom Search.
Copy that Search engine unique ID and paste it in the relevant box of this plugins page. Click on Save Changes to save this setting.

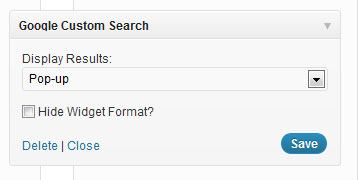
Lastly, just drag and drop this Google Custom Search widget where you want to display search box. You can add this widget in any widgetized area of your site.

Notice the drop-down menu in this widget. You can configure where should your results be displayed. You have three options:
- Popup: Search results will be displayed in a popup.
- Within widget: Results will be displaed under the search box.
- Custom: Results can be displayed anywhere by using the code provided by this plugin.
If you select the third “custom” option, then you can display the search box anywhere in the theme. To do this, you’ll need to use PHP code shown in the plugin’s official page.
This plugin makes life real easy as you just need to add the search engine unique ID to the options page and you’re set. The widget can be dropped at any place where you want the search box to appear. No doubt this is very simple and easy method to add custom Google search to WordPress site.
