Most modern websites we see today are usually dynamic, in terms of look and feel. The site elements respond to our cursor movements, button clicks, key-press events etc., adding to the general awesomeness of our web experience. Image slideshows are a common part of such websites, and express much more about the motive behind them, be it showcasing the products you’re selling if you’re running a business website, your creativity and skills if you’re running a portfolio site, or basically anything in particular. As the saying goes, A picture is worth a thousand words.
In this tutorial, we’re going to talk about adding a responsive image slideshow to your WordPress website, in a few easy steps. By responsive, we mean a slideshow which we could control with simple events such as mouse-clicks to change the image, etc.
There are two ways you could this in WordPress:
- The Hard Way – Manually code your slideshow using JavaScript and HTML/CSS. Recommended for those who’re good at programming.
- The Easy Way – Use a WordPress plugin to simply create a slideshow, and use a function call (or shortcode) to place it on your site. Recommended for those who’re not comfortable with the coding part, or probably too lazy to do so.
We’re going by “The Easy Way” here, so we’ll be using the vSlider Image Slider plugin. There are actually a lot of similar plugins available on the WordPress repository, but I’m going with this plugin mainly because of two reasons:
- DOES NOT use Flash. I highly recommend avoiding Flash slideshows because they’re usually CPU and Memory hoggers. Also, Flash is rapidly becoming an obsolete technology with the introduction of HTML5.
- I wanted a plugin, which provides me an option to place my slideshow anywhere I want, be it inside template files, Posts, Pages or even Sidebars.
Step 1: Install the Plugin
As with every other plugin, the first step is always to install and activate the plugin from your WordPress back-end. As mentioned above, we’re using the vSlider Image Slider plugin here.
Step 2: Create Slider
After installing and activating the plugin, a new tab labelled “vSlider” would appear on the Back-end left-side menu.

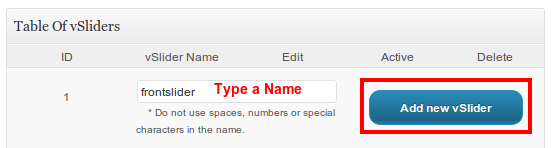
To create a slider, navigate to vSlider >> vSlider, type in a name for your new slideshow (I’m using “frontslider” here), and click on the “Add new vSlider” button.
Step 3: Configure your Slider
Now, it’s time to configure the slider, which you’ve just created. On the same page (i.e. vSlider >> vSlider), click on the “Edit” button in front of your slider, to open the settings page for that slider. The Settings page is divided into different sections, each of them with a set of configuration options. Let’s go through each section briefly, and discuss about the kind of configuration options it offers.
General Settings
As the name suggests, this section offer basic configuration options, such as resolution of the slideshow (width X height), time between rotations, slide effects, and other similar options.
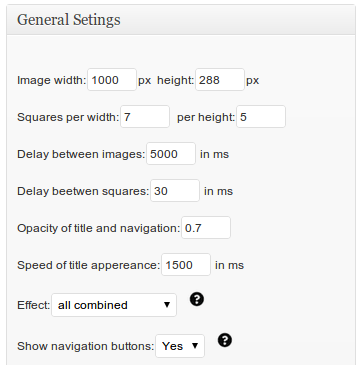
Image Source
In this section, you may select whether you want custom uploaded images in your slider, or images fetched from categories or posts etc. Make sure you don’t miss out on the number of slides option. It is small, and could be easily overseen.

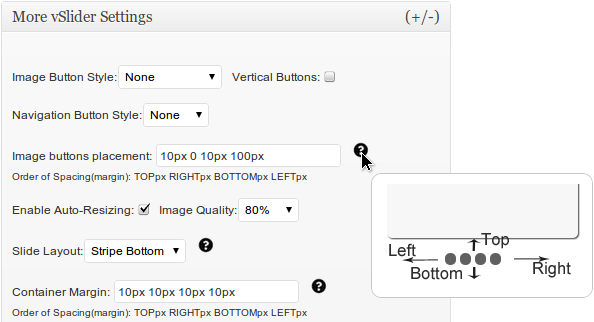
More vSlider Settings
This section lets you configure the action buttons appearing with your slider, and layout settings. The help tool-tips are very handy, in-case, if the purpose of a particular configuration option is obscure.
Make sure you save changes to your settings, after modifying them.
Step 4: Add Images to Slider
Inserting images to your slider is very easy. On the same Settings page, after selecting the number of slides you want in your slider, and saving changes, a few sections would appear titled “Custom Slider 1”, “Custom Slider 2”, and so on.
To add an image, open each section one-by-one, and insert the path to the image you want to include in your slider. You may also upload an image, using the small icon next to the “Image URL” field. Again, save changes after inserting all the images.

You’ve now successfully created a slider, and inserted images to it. Now, it’s time to insert in on your site.
Step 5: Placing Slider on Front-end
There are three ways you could place your slider:
PHP Function
If you want to place your slider inside your template files, you may use the following function by inserting it at the location, where you want your slider to appear on the Front-end. Don’t forget to replace the slider name with the one you created.
//Replace 'frontslider' with the name of your slider
<?php if(function_exists('vslider')){ vslider('frontslider'); } ?>
Shortcode
There’s also a shortcode available, which allows you insert your slider inside WordPress Posts or Pages. You just simply need to insert the following shortcode inside the Post or Page. Make sure you change the name of the slider.
[vslider name="frontslider"]
Widget
If you want to add the slideshow on the sidebar of your theme, the plugin comes with a widget for that purpose. You simply need to place the vSlider Widget (Appearance >> Widgets) on your sidebar, and choose your slider from the drop-down menu.
Go ahead, and give this plugin a shot. The level of flexibility and customization it provides is astonishing. If you’re using any other plugin for the same purpose, and you feel it has some unique features which other plugins don’t offer, feel free to share with us.