Custom Fields are as essential part of WordPress, and are used to pass meta-data to a WordPress Post, Page or even Custom Post Types. They are handled in the form of an associative array i.e. key => value pairs. Every key has an associated value attached to it, with the key part being it’s identity. Hence, whenever a key is set for a Post or Page from the back-end, the template file recognizes it, and strip it’s value part to use it as desired.
In this tutorial, we’re going to talk about a scenario, where we want to change the color of any WordPress Post Title, i.e. the ability to set different colors for different Post titles. Of course, we could do much more with Custom Fields, and the examples are endless. This is just to introduce you to the concept of Custom Fields in WordPress, and how effectively you could use them in your WordPress site.
This is how a WordPress Post currently look like, from the front-end.

So, to create a new custom field, you need to make sure they’re ready to be recognized by your template files first. Here’s how you could do it in a couple of simple steps.
Step 1: Create Custom Field in Template File (inside WordPress Loop)
Go to Appearance >> Editor from your WordPress back-end, and choose the template file where you want to use the meta-data, set by a custom key. For the above stated scenario, I’ve used the following code to change the color of the post title, depending upon the value set from the back-end.
<?php $title_color = get_post_meta($post->ID, 'title_color', true);
	if ($title_color): ?>
		<h1 class="entry-title" style="color: <?php echo $title_color ?>">
                <?php the_title(); ?>
        </h1>
	<?php else : ?>
		<h1 class="entry-title">
                <?php the_title(); ?>
        </h1>
	<?php endif; ?>
The main focus here is the get_post_meta() function. It takes three arguments:
- First argument is the ID of the post, for which the custom field is set. If you’re using the function inside a WordPress loop, $post->ID would automatically retrieve the ID for you.
- Second argument is the name of the key. If a custom field is set for an item using the key name specified here, the function will recognize, and provide it’s value part as the output. Make sure it’s unique for every key.
- The third argument is boolean type, and specifies whether the value should be returned as a string (true), or as an array of values (false).
Step 2: Add Custom Field to a WordPress Post
After you’ve successfully added a call to the get_post_meta() function in your theme’s template file, it’s time to add the custom field to a post. By default, the Custom Fields section is hidden, so you need to enable it first. To do that, go to your Post or Page Edit screen from the back-end, and click on the “Screen Options” link at the top-right position of your screen. It’ll drop-down to show a set of check-boxes. Tick the one appearing alongside “Custom Fields” to enable it.

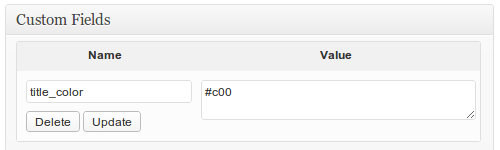
After enabling, this is how the Custom Fields section would look like.

Now, add a new Custom Field by providing the key part under the “Name”, and value part under “Value”. Finally, hit the “Add Custom Field” button, and Publish/Update your Post or Page for changes to take effect.
This is how the front-end of the post looks like, after adding a Custom Field (Notice the title color has changed to a shade of Red).
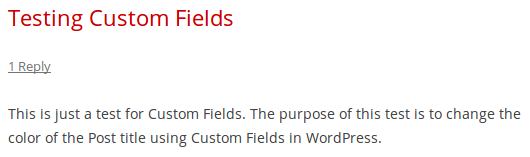
You may notice how easy it is to change the color of the title now. Using the “title_color” custom field, you may set different color for different post titles easily, without having to deal with the CSS. You could do many different things with Custom Fields, such as set a different background image for every Post or Page, or change the content layout by providing the number of content columns, etc. Let us know if you find this tutorial helpful, and share with us your ideas or examples of using Custom Fields.
COOL! Now I can create one for my site 😀 thanks for the tutorial, very useful