So if you have taken the decision to try out WordPress, then the first step requires you to install WordPress on your server (or webhost). This installation would be called as self-hosted WordPress site which means that you are installing WordPress on your own server. But since many people are not familiar with database and other stuff, you can go forward the easy way – by using one click auto-installer like Fantastico which can be accessed from cPanel.
The plus point or the biggest advantage of using Fantastico is that this is the fastest and easiest way to get WordPress running, and you don’t even need any technical skills for this task. In this post, you will learn how to install WordPress using Fantastico one-click auto installer from cPanel.
How to Setup WordPress using Fantastico
Step 1: Login to your cPanel and click on Fantastico De Luxe. This will open Fantastico, which is a one-click script installer using which you can install many different scripts.

Step 2: From the left sidebar, click on WordPress.

Step 3: Next, click on New Installation.
Step 4: This is where you need to enter all the details related to your new WordPress installation. Read the explanation from below for each of these fields:
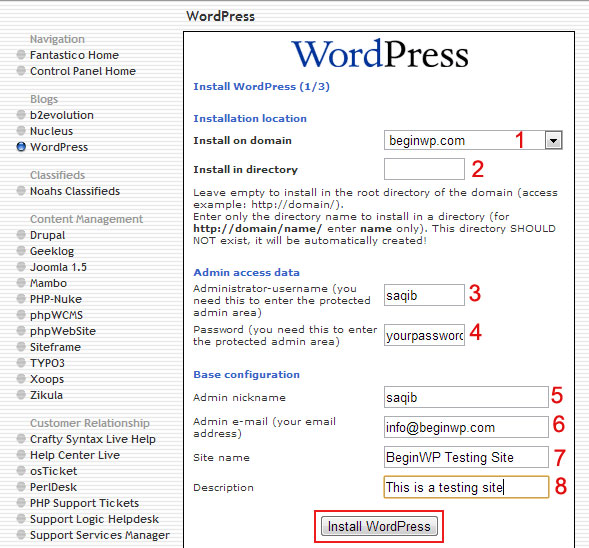
- Install on domain: Select the domain where you want to install WordPress on.
- Install on directory: If you would like to install WordPress on the root directory, then leave this field as blank. For those who don’t know, root directory means http://domain.com. But if you would like to install WordPress in a directory (for example on http://domain.com/blog) then enter only “blog” there. Also there should not be any directory named as “blog”, as it will be automatically created by Fantastico.
- Admin username: Enter the username which you wish to set for your new WordPress installation. You will be able to access your WordPress site by using this username, so note it down.
- Admin password: Enter the password which you wish to set. You will be able to access your WordPress site by using this password.
- Admin nickname: Your name that will appear in all posts. This can be changed later on.
- Admin email: Enter your email address. This will be the email that is associated with your Admin account and you will get password recover email in this email address.
- Site name: Enter the name of your site. You can change this later on from Settings.
- Description: Enter a short description of your site. This can also be changed from Settings.
When you have filled out all the information, hit the Install WordPress button.
Wait for sometime to finish the installation process and then click on the “Finish installation” button. You will also be notified about your username, password and login/admin area URL. Use this URL to access your WordPress login area and then use your username and password to login to your site.
Once you login, you will be able to see your WordPress Dashboard. Congratulations, you are all set.
If you are new to WordPress, then the next step would be to refer to some WordPress tutorials and the official WordPress Codex.