The beauty of WordPress lies in its simple, non-complex interface which is perfectly suitable for not-so experienced and not-so tech savvy users. WordPress is now so flexible that this CMS can be used to build different websites and not just blogs. If you select WordPress to build websites and blogs, then you may like to learn about setting up a MySQL database, adding users to database, creating backups, importing and exporting data and checking and repairing the database. Don’t worry, you don’t need to be a programmer to understand all this as this tutorial is targeted towards WordPress beginners. Just read this small guide to get familiar with performing all these functions easily.
Note that this tutorial will only apply to those who opt for self-hosted WordPress available from WordPress.org. Choosing self-hosted solution means you have complete control over the look and feel of your site, plus you have the freedom to install themes and plugins that you wish to.
Now that you have taken the hard decision to use self hosted WordPress installation, let’s get started. This post is targeted towards beginners who want to manually create a new database, add a user to a database, assign privileges, export and import data and repair the database table.
Setup/Create a New Database
As you know that WordPress runs on MySQL database, which you will be able to find on many popular web hosts and it doesn’t matter if that web host is offering Linux or Microsoft package.
Find a good web host and you can use one click auto-installer like Fantastico or Softaculous to install WordPress. These tools make life real easy, as you have to just fill in the required fields and install any script (or web application) within seconds.
But just in case if your web host doesn’t offer any such auto-installer (which would be a very rare case), then you will have to install WordPress the traditional way, by first creating a new MySQL database from cPanel (or any other hosting control panel that your web host offers).
Login to your cPanel (web hosting control panel) with the details sent to you in the welcome email by your web host. Scroll down and then click on MySQL Databases.

From here, you can create a new database and then assign a user to that database.
Enter the name of your new database and then click on Create Database button.

You will now notice that the database has now added a prefix and the name will now look something like this: prefix_dbname. Your new database is now created.
Adding a User to a Database
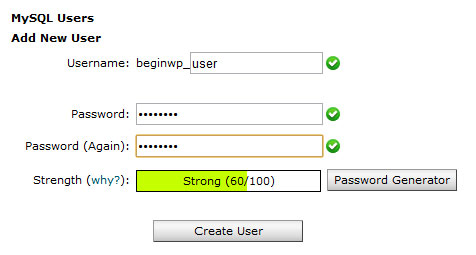
To add a new user to database, click on Add New User. Add a username (notice the prefix), password and re-enter password. Once you are done, hit the Create User button.
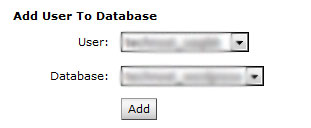
Now its time to assign the new user to the database that we have created in the above step. In the same MySQL page, select the user for the correct database and then click on Add.
A screen will appear in which you have to check mark on All Privileges and then click on Make Changes button.

When you are configuring WordPress, you will need to add the database name, username and password in the wp-config.php file from the root of your WordPress directory. Make sure you note down all this information as it will be required when installing WordPress.
Exporting and then Importing Data by using phpMyAdmin
If you are new to WordPress and are writing your first blog post, then this step is not required. But if you have installed new WordPress (may be on your new webhost), then you will need to import posts and comments from another website. This can be achieved by using the export tool in phpMyAdmin.
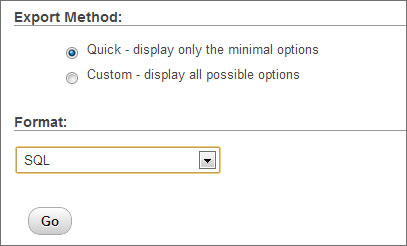
Open cPanel and click on phpMyAdmin from the Databases section. Now, select the appropriate database name from the left side of the window and then select Export button from the menu. You can then select your export method from – Quick or Custom. Select the format from the drop-down menu, which in most cases would be SQL and then hit the Go button to download your database dump to your computer.
You need to perform this export operation from the website from which you want to import data from.
Once you have saved the SQL dump, it’s time to Import the data into your new WordPress installation. Firstly, create a new database, add user to this database and then select Import and use the Browse button to locate the MySQL dump file which you have saved on your computer. Click on the Go button to begin uploading.

Once done, you will see that your data has been imported from your old site to new site. Also note that this will overwrite any of your identical data.
Exporting and Importing Data by using built-in tools of WordPress
The above method is somewhat lengthy and not for those who are not familiar with phpMyAdmin. That’s why, here’s an easy method to import the data using the native WordPress features. The best part of this feature is that you can import the data from other platforms also like Blogger, Live Journal, RSS, Tumblr, Movable Type and TypePad and WordPress.
This option can be accessed from Tools menu in the WordPress Dashboard. Select Export to export the data and then use Import to import the data to your new site. When you select Export, you have the option to export all content, posts or pages. Select All content and then click on Download Export File.

Repair Database Table
Database issues can be solved by a database repair. This option can be accessed from phpMyAdmin from cPanel. You can perform checks and repairs on a single table or select all tables.
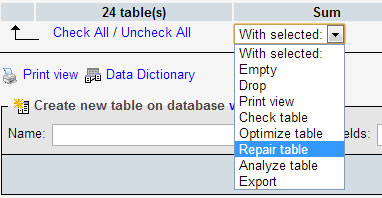
From the phpMyAdmin screen, select the database from the left side. Click on the Structure view, use the Check All option to select all tables and then from the dropdown menu, select Check Table or Repair Table.
So that’s it. Perform all these operations with acute care as dealing with databases is not that easy. Once you setup your new blog, don’t forget to backup your WordPress installation at regular intervals.