When it comes to WordPress, then WooCommerce is definitely the most popular ecommerce plugin out there. This plugin is developed by WooThemes and is the choice of many small business users and anyone who wants to sell with WordPress, be it a physical product or a digital product. So if you’re running on Genesis Framework from Studiopress and are thinking to use WooCommerce, then here’s how to add WooCommerce to your Genesis child theme.
You might think that why is there even the need to read this? You can just install WooCommerce and be done with it, right? Wrong, the problem is that sometimes Genesis child themes doesn’t support WooCommece out of the box. That’s why, after activating WooCommerce, the styling of the theme is messed up. The styling of the homepage, category page, product page and sidebar may not be what you were expecting and that’s why there’s the need for you to read this small tutorial.
Now the good thing is that the developers over at Studiopress have listened to our problems and there’s something really simple that you can do to take care of this problem.
Using A Child Theme
Before we delve deeper, I would highly recommend you to use a child theme for this purpose. While many people would even argue to use child themes, but using a child theme has its own advantages such as:
- Make changes without affecting the original theme’s code.
- Your changes won’t be lost even after updating the parent theme.
- Easy customization as a child theme usually contains only the important files, so that searching and editing a code is really easy.
You can use a ready made Genesis child theme or even create your very own child theme. There are also plugins like the Child Theme Configurator or the Child Themify that will help you to easily create child theme with a few clicks.
Even if you don’t plan to use any child theme and are using the Genesis Framework alone, then also you can follow this tutorial. Before proceeding forward, I assume that you have already installed and activated the WooCommerce plugin. Also after installing WooCommerce, don’t forget to click on “Install WooCommerce pages” button.

Installing the Plugin
Now, to add WooCommerce support to your Genesis child theme, install and activate the Genesis Connect for WooCommerce plugin.

Once you have activated the plugin, you will be able to see a screen like below:
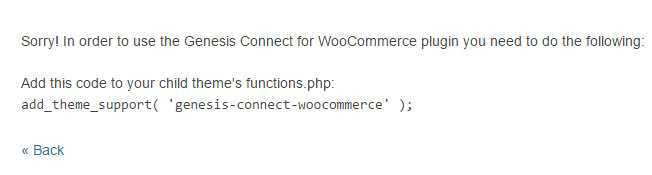
Don’t worry, you are supposed to get this screen. As you can see from the instructions on this screen, copy the one line code and then click on the back button.
If you have not copied the code, then here it is:
add_theme_support( ‘genesis-connect-woocommerce’ );
Now that you have the code, go to Appearance > Editor. You would need to add this code to the functions.php of the child theme that you are using.
To do this, click on functions.php from the sidebar (and not on custom_functions.php) and then add/paste the code at the bottom of the file and click on the Update File button.
Now that you have placed the code in the correct file, it is time to go back to Plugins section and activate the Genesis Connect for WooCommerce plugin again.
That’s all you need to do. You can now add new products to your site by going to Products > Add New, and then check out the preview of how it looks in the frontend.
The developer of this plugin says that for easy customization, you can also copy the single-product.php, archive-product.php and taxonomy.php templates to your child theme’s “woocommerce” folder (if you don’t have such a folder, then create one). The advantage of doing this is that you can customize these files as per your wish, and also your changes won’t be lost when a new version of the plugin comes up.
With this being done, you have just added WooCommerce support to your Genesis child theme.