It is very essential to backup your WordPress blog regularly because various types of coding/installation errors, server’s hardware/hard drive failure, network failure etc. can occur anytime and you could loose or lose access to your site’s valuable data.
But if you have access to your site’s recent backup file, then you can very easily access/restore your entire site using it. Let’s check out in this post some manual methods using which you can easily backup your entire installation of WordPress.
Backup WordPress using cPanel’s built in full backup feature
If you are using cPanel hosting control panel for managing your websites on the internet, then a self hosted installation of WordPress can be easily backed up using cPanel’s inbuilt backup feature. When you backup your account using full backup feature of cPanel EVERYTHING in your account like your Home directory, MySQL databases, email forwarders configuration, email filters configuration, all emails that are stored on your server etc. gets backed up in a single .tar.gz file.
Follow these steps in order to backup your entire account using cPanel’s inbuilt full backup feature:
1. Login to your cPanel account using the login URL provided in the welcome email that you received at the time of signing up with your web host. A typical secure cPanel login URL looks something like: https://<Server Name>.<Some Domain of your web host>:2083/.
2. Once you are successfully logged in into your account, click on Backup wizard icon present under Files:

3. The immediate next page will ask you whether you’d like to backup or restore your account? Click on the Backup button and you will get redirected to the next page:

4. The next page will ask you whether you’d like to fully backup your entire account or create a partial backup of your home directory or MySQL database or email forwarders and filters:

It’s always a good idea to generate a full backup of your entire account instead of a partial backup as a full backup not only allows you to keep a local copy of all your files onto your computer’s hard drive, but it also allows you to move your account from one host to another. A full backup file can be easily restored by a web host using SSH commands, while a partial backup file may take some time to get restored as you or your web host are required to restore everything manually.
5. When you click on full backup button, the next page will show you to select/enter following details:

- Backups available for download: If in the past you or your web host have generated a full backup file and if that file is currently present in your account’s home directory, then you will see its name along with the day, date and time of its generation in this field.
- Backup Destination: Select Home directory as your backup destination from the drop down menu.
- Email address: Enter your email address in the field provided where you’d like to get an email notification when your backup file is successfully generated. By default cPanel will use your email address that is present in your account, but you can always enter a different email address of your choice.
Click on “Generate Backup” button and cPanel will instantly start generating your full backup file. Depending on the total number of files and data stored in your account, the backup process may take few minutes/hours to complete. When the process is complete you will get a notification email in your inbox:

The backup file will be present in your account’s home directory and will be in .tar.gz format. You can download that particular file onto your computer’s hard drive using cPanel’s inbuilt File Manager. All you need to do is to click on the name of the file and then click on download link. You can also download this backup file using a FTP program like FileZilla.
Excluding files and directories from the final backup file (For Advanced users only): Now some of you may be thinking that what if you have multiple domains/sub-domains/sub-directories in your hosting account and you only want to backup that particular domain/sub-domain/sub-directory which is using WordPress. In that case you can always exclude certain directories and files of your choice from the final cPanel backup file. Let’s check out how to do so:
By default cPanel backup file contains EVERYTHING present in your account. However if you’d like to exclude certain directory from the final .tar.gz file, then you need to configure cpbackup-exclude.conf file that is present in the home directory of your account as well as inside the etc folder:
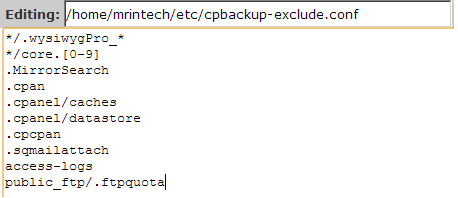
The cpbackup-exclude.conf file that is present in your home directory is known as Local Exclude File, and cpbackup-exclude.conf file that is located inside etc folder is known as the Global Exclude File. The local exclude file allows you to exclude files and directories of your choice from the backup of specific users, while the global exclude files allows you to exclude files and directories from backup of ALL users.
As per your exclude requirements, open cpbackup-exclude.conf file and type the name of all the items, one per line, which you want to exclude from the final backup. Keep in mind that if you enter the name of a particular directory in this file then all the sub-files and sub-directories present inside it will also be excluded.
How to Restore your full cPanel Backup file?
If you’d like to restore your full cPanel Backup file i.e. .tar.gz file, then all you need to do is to provide this file to your web host and ask them to restore your entire account. You can also restore your account using the .tar.gz file yourself provided that you have full root SSH access in your account.
Keep in mind that when you restore your entire account using the full backup file, any previous data will get fully deleted/over-written.
Backup using WordPress’s inbuilt Export Feature
If you think that the above manual method of backing up WordPress via cPanel is not for you then here’s another method that you might find more easy. The built in export feature of WordPress is probably the easiest way of backing up your site’s data onto your computer’s hard drive. Follow these steps if you would like to backup your data using this feature:
1. If you are an administrator of your blog, then login to your admin account and then click on “Export” present under tools:

2. The immediate next page will ask you what you’d like to backup:
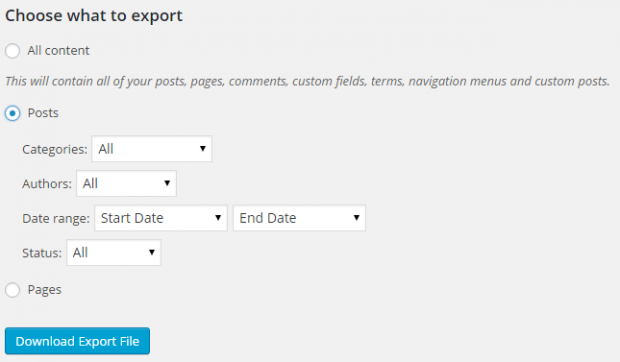
- All content: This will include all your posts, pages, user comments, custom fields, terms, navigation menus and custom posts.
- Post Only: By default WordPress allows you to backup each and every post (with status of published, scheduled, draft, pending and private) present under ALL categories and made by ALL authors of your blog. But if you’d like to backup only those posts that are made under certain category or made by certain author then feel free to select that particular category/author name from the drop down menu. In case if you’d like to backup only those posts that are made in between two particular dates, then feel free to select your date range using the drop down menu.
- Pages only: By default WordPress allows you to backup each and every page (with status of published, scheduled, draft, pending and private) that are made by all authors of your blog. But if you’d like to backup only those pages that are made by a certain author then feel free to select that particular author name from the drop down menu. In case if you’d like to backup only those pages that are made in between two particular dates, then feel free to select your date range using the drop down menu.
Once you have selected your preferred export option, click on the “Download Export File” button and WordPress will start processing your request on the server. Once your export request is successfully processed, your browser will ask you where you’d like to save the exported XML file:
The name of the .xml file will look something like following:
<Name of your blog>.wordpress.<Date of backup in YYYY-MM-DD>.xml
How to Restore your blog’s data using the export file?
If in near future you would like to restore your blog content using the export file that you have downloaded in the previous step, then follow these steps in order to do so:
1. Login to your WordPress dashboard as an administrator and click on import under tools:
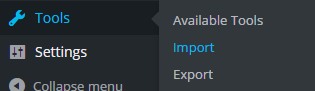
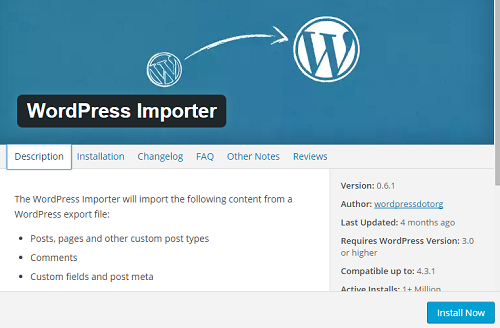
2. When you click on import, the next page will ask you from where you’d like to import data into your site. Click on “WordPress” present at the very bottom of the list and your installation will ask you to install WordPress importer before you can start the import process:

Note: It is mandatory to install WordPress importer in your blog if you would like to import content from an XML file that you have generated in the past. Without installing WordPress importer you won’t be able to restore your content.
Once WordPress importer has been successfully installed in your installation, activate the plug-in and the next page will ask you to upload your previously backed up XML file aka WordPress eXtended RSS (WXR) file.
Click on choose file button and then select the XML file that you have downloaded onto your computer’s hard drive. Once you have successfully selected the file, click on upload file and import button and WordPress will ask you to enter/select following details:

- Assign Authors: You may want to assign a single/different author to all the imported items on your site. WordPress will ask you to assign a post/page to an existing user of your installation or it will ask you to first create a new user in your installation and then assign posts to this newly created author.
- Check the box in front of download and import file attachments, if you’d like to import all the images, PDF files, video files etc. that are attached to your other blog from where you are importing content.
Once you have entered/selected above mentioned details, click on submit button and the CMS will instantly start importing your posts.
How to Manually Backup /wp-content/ Directory and MySQL Database
/wp-content/ directory and MySQL database of your blog are two of the most important elements of your self hosted installation of WordPress. Let’s check out how to backup each one of them manually and separately:
Backup /wp-content/ directory
/wp-content/ directory of your installation contains following important elements of your installation:
- Core plugin files of both active and inactive plugins.
- Core theme files (CSS, PHP etc.) of both active and inactive themes.
- WordPress Upload Directory (/wp-content/uploads/) – Whatever (JPEG/PNG images, PDF files, DOC/DOCX files, video files etc.) you upload to your blog using WordPress’s inbuilt uploader stays inside this folder.
- Configuration and cache folders of some active plugins.
Using cPanel’s inbuilt file manager you can directly download this particular folder onto your hard drive. All you need to do is to follow these steps:
1. Login to your cPanel account and click on File Manager icon present under Files:

2. A new box will pop-up which will ask you to select the directory in your account where you’d like to go. Click on Document root for and then select the domain/sub-domain from the drop down menu whose /wp-content/ folder you’d like to backup:

Once you have selected the domain name, click on Go button and File Manager will load in a new tab/window.
3. You will now be able to see /wp-content/ folder in the list. Right click on it and click on Compress:
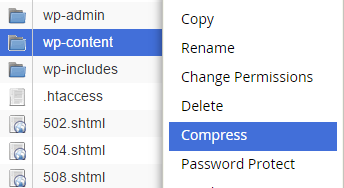
File Manager will now ask you to select your preferred compression type from Zip Archive, Tar Archive, GZiped Tar Archive and Bzip2ed Tar Archive:

It will also ask you about the location where you’d like to save the compressed file on your server. Select your preferred compression format and location and click on Compress File(s) button. File Manager will start compressing your file instantly:
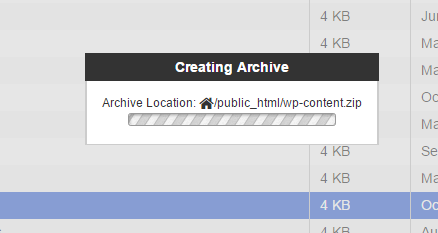
Depending on the total file size of /wp-content/ folder, it could take some time for the folder to fully get compressed. Once the /wp-content/ folder is fully compressed, right click on it and then click on Download:
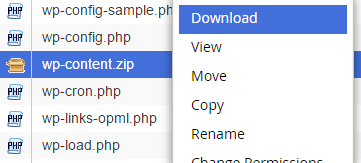
Your browser will now ask you where you’d like to save the compressed file onto your hard drive. Select the location of your choice and then click on Save button.
Note: You can also save /wp-content/ folder onto your computer’s hard drive using FTP/SFTP client.
Restore /wp-content/ directory
If you’d like to restore your /wp-content/ directory in future, then all you need to do is to re-upload the compressed file to your domain’s root directory using cPanel’s file manager and unpack the archive.

You can also make use of FTP/SFTP clients to directly upload the backed up /wp-content/ folder to your domain’s root directory.
Backup MySQL Database using phpMyAdmin
cPanel comes with phpMyAdmin that allows you manage and administer your account’s MySQL databases. If you’d like to backup your WordPress database using phpMyAdmin, then all you need to do is to follow these steps:
1. Login to your cPanel account and then click on phpMyAdmin icon present under Databases:

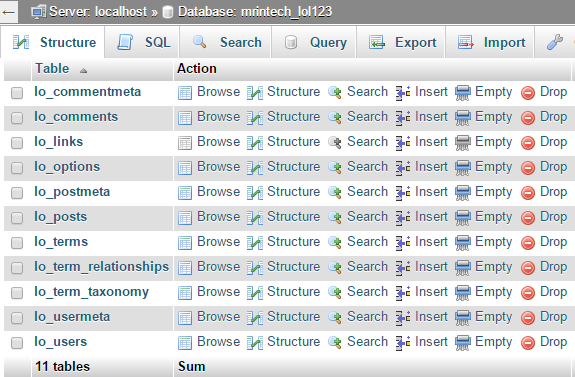
2. cPanel will now redirect you to your phpMyAdmin control panel. On the left sidebar of this control panel, you will be able to see a list of all the databases currently present in your account:

Note: You may have to click on Plus (+) sign to view a full list of databases.
Click on the name of the database that your WordPress site is currently using and which you want to back up. If you are unable to figure out which database your WordPress site is using, then you can take help from your host by opening a support ticket with them.
3. When you click on the name of the database you will now be able to see a list of all the tables that are contained within this database on the right hand side:
Click on Export button present at the top and the control panel will now ask you to choose your export method from Quick and Custom. Quick Export displays only the minimal options, while Custom Export displays all possible advanced options. Choose Custom Export and start selecting following options:
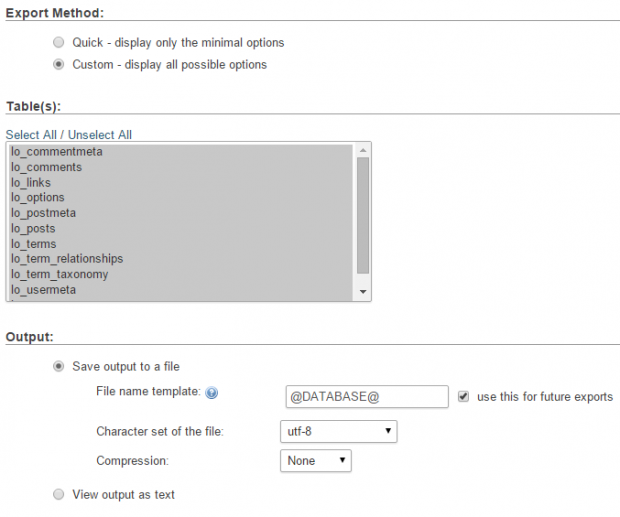
- Click on Select All under Tables.
- Under Output make sure to select Save Output to a file and select None from the drop down menu in front of Compression.
- Select SQL from the Format drop down menu.
- Under Object creation options check the box in front of Add DROP TABLE. Also make sure that you select IF NOT EXISTS.
- Leave every other options to their default values.
Click on GO button and your server will start processing your request. Once the processing is finished, your browser will ask you where you’d like to save the .sql file.
Restoring your MySQL database
If you have properly backed up your MySQL database onto your computer’s hard drive, then you can restore the database using the IMPORT feature of phpMyAdmin. However we will highly suggest you not to import the database all by yourself, as database is a very important element of your website. A single error may result in database corruption and all your data will be lost. We highly recommend that you should open a support ticket with your web host and ask them to restore your database.
If you are providing your own database backup file to your host, then they won’t charge you a single penny. In rare cases they may ask you for restoration charges, so discuss about possible charges in the support ticket itself.
So that’s it. Hope you find this step-by-step guide on WordPress backup as useful. If you like this tutorial, then please follow us on Twitter and Google+.