Ever wanted a simple to understand guide that explains you on how to configure MaxCDN with a WordPress plugin like WP Super Cache? Then this “easy guide” is what you really need. All the steps are explained in detail so that you’re not stuck anywhere in the whole process of implementing a CDN. We’ll start with the basics and then move towards advanced stuff.
If you’re new to this so called CDN term, then CDN, short for Content Delivery Network is used to speed up the page serving of your website. A CDN is a network of servers around the globe with the purpose of delivering content to the visitor in the fastest way ever possible.
Normally, all of your data is transferred from one server but after implementing CDN, your data (or content) is served from the location which is close to the visitor. This means that your static files like images, javascript, CSS, etc are hosted by a CDN and whenever required, all these static files are served from CDN directly resulting in faster loading of your web pages and less load on your webhost.
In short, if you are serious about improving your site’s performance, then CDN is what you should definitely employ. Now that you know what a CDN is, let’s take a closer look at MaxCDN.
MaxCDN – Pricing and Other Details
MaxCDN is a CDN service provider that is very simple to implement. Head over to MaxCDN to sign-up for the service. If you are just starting up, then you can start with the “Starter” pack that offers 1TB of bandwidth valid for a year, for a price of $39.95 per year. This starter pack should be enough for most small and medium sized websites, but high traffic websites can opt for “Business” package.
Webmasters can also purchase additional bandwidth whenever required. You are also offered with a 30 day money back guarantee, which means you can cancel the service during this period.
You can pay using PayPal or a credit card and once the payment process is complete, you will get an activation email. Click on that link to activate your account and then login with your email address and password.
Configuring MaxCDN
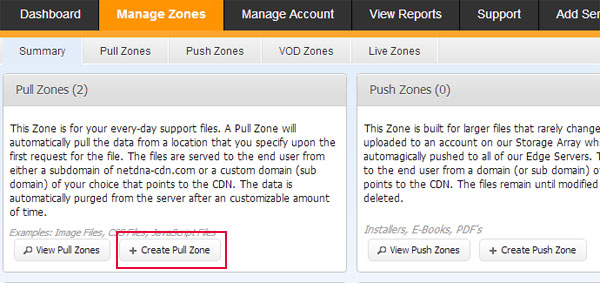
It’s time to configure MaxCDN. After logging-in, go to “Manage Zones” menu on the MaxCDN website. From here, you can see different type of zones that you can create such as pull zones, push zones, VOD zones and live zones.
We’re interested in Pull Zone. Click on “Create Pull Zone” button.
On the next page, you will need to fill out the information in the fields.
- Pull Zone Name: Enter name of this pull zone. This field will help you identify your zone.
- Origin Server URL: Enter the full address of your website in this field. Don’t forget to include “http://” and the trailing slash (/) at the end of the URL.
- Custom CDN Domain: Enter your custom CDN URL here. For example: cdn.beginwp.com. This step is optional but important for branding purposes.
- Label: Enter a label that describes your zone.
- Compression: Checkmark to enable compression (recommended).

Once you fill out all these fields, click on “Create.” You will now get a CNAME record that you need to add in your cPanel (or domain manager). Note down this URL for now.
Creating a CNAME Record
Now that you have configured MaxCDN, it’s time to create a new CNAME record by visiting your web hosting control panel, also known as cPanel.
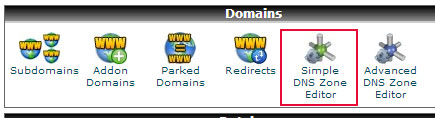
Visit your cPanel and scroll down to the Domains section. Click on “Simple DNS Zone Editor.”
From the next sreen, you’ll need to fill out both the fields.
- Name: Enter the prefix/first part of your custom domain. This would be what you have written in MaxCDN in “Custom CDN Domain”. For example, cdn.beginwp.com
- CNAME: This will be URL provided to you by MaxCDN when you created the pull zone. This would look something like: zone.company.netdna-cdn.com

Once you fill out both the fields, click on “Add CNAME record” button.
Configure WP Super Cache with MaxCDN
Till now we have completed setting up pull zone in MaxCDN and also added CNAME record to use MaxCDN. Now it’s time to setup WP Super Cache with MaxCDN.
If you haven’t installed WP Super Cache plugin, then do this now. After installing and activating this plugin, go to Settings > WP Super Cache and click on “CDN” tab.
Put a checkmark on “Enable CDN Support” and in the “Off-site URL” field, enter the CNAME URL. For example: cdn.beginwp.com

There’s no need to configure other settings, but if you know what you are doing, then you can configure it. Finally, click on “Save Changes” button.
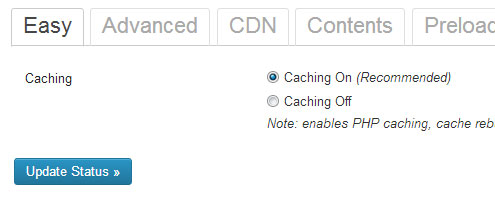
To enable CDN support, go to “Easy” tab, click on “Caching On” and then click on “Update Status” button.
Testing MaxCDN
It’s time to check if everything’s working as expected or not. To test, open your site and look at the URL of the images. Your images should be loaded from your CDN and the URL will include what you have set in the CNAME record.
For example: http://cdn.beginwp.com/wp-content/uploads/2011/02/logo.png
If you are able to see such a URL, then congratulations, you have setup everything perfectly.
Keep a check on the reporting section of MaxCDN website to know how much bandwidth your website is consuming.
Just in case if you would like to clear cache on MaxCDN, then login to the website, click on “Manage” and then on “Cache.” Click on “Purge” to delete your cache manually from the CDN. You will need to do this only when you think that the MaxCDN is still serving old files. This happens only in cases where you have deleted the file and replaced it with a new one, but sometimes it takes time to update the file on MaxCDN. In such a case, you can manually delete cache by following the above method.
[box type=”info”]MaxCDN is offering our readers a discount. Use “BeginWP” as coupon code to save 25% when signing-up.[/box]