Genesis framework from StudioPress is one of the most popular WordPress framework out there, and for many developers, it is the starting point of building sites. There are also many free and paid child themes available for this framework so that anyone can quickly get started. Beginners who are new to this framework may have problem in figuring out how some of the basic things work, such as how to change the footer credits, add a tracking code, or how to add a logo to their site. These are some basic tasks that needs to be achieved after changing the theme.
This article, therefore, is a collection of 10 such best tips and tutorials for Genesis framework users. These would really come in handy especially for those who are new to this framework. So go ahead and start learning!
Customize Genesis footer credits
If you are new to Genesis framework, then one thing that you will definitely want to change is the footer credits. Now, there are two ways to do this, and you can choose any one of these methods depending on your comfort level.
Plugin method
If you want to do this by the easiest way ever possible, then as always, here’s a plugin for that. This method doesn’t involve the need to manually add any PHP or write filters.
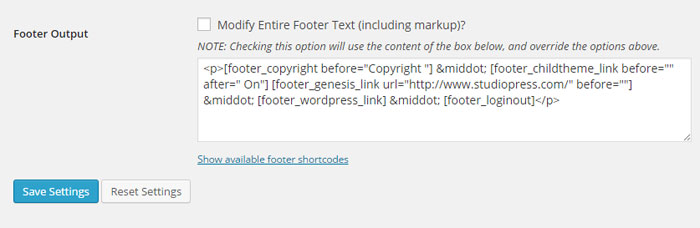
Install and activate the Genesis Simple Edits plugin. Now go to Genesis > Simple Edits page in your WordPress dashboard and place a checkmark on “Modify Entire Footer Text” option. Now all you need to do is to enter your own custom HTML code in this box, save it and it will reflect in your front end.
Coding method
If you are one of those who don’t prefer plugin for each and every task, then this method is for you. With this method, you can customize the Genesis site footer with the help of a custom function.
Open your child theme’s functions.php and paste this exact code snippet at the end of your file.
<?php
//* Do NOT include the opening php tag
//* Remove the site footer
remove_action( 'genesis_footer', 'genesis_footer_markup_open', 5 );
remove_action( 'genesis_footer', 'genesis_do_footer' );
remove_action( 'genesis_footer', 'genesis_footer_markup_close', 15 );
//* Customize the site footer
add_action( 'genesis_footer', 'bg_custom_footer' );
function bg_custom_footer() { ?>

	<div class="site-footer"><div class="wrap"><p>Developed by Company. Powered by <a href="http://wordpress.org/">WordPress</a>. </p></div></div>

<?php
}
Now you can edit the link, text or change the structure depending on how you want it to look.
Edit the post-info and post-meta
If you want to modify the post info and meta information, like the post date, author, comment, tags and categories, then you will find the Genesis Simple Edits plugin very useful. To edit, you can use text, shortcodes or HTML in the provided textbox in Genesis > Simple Edits menu.
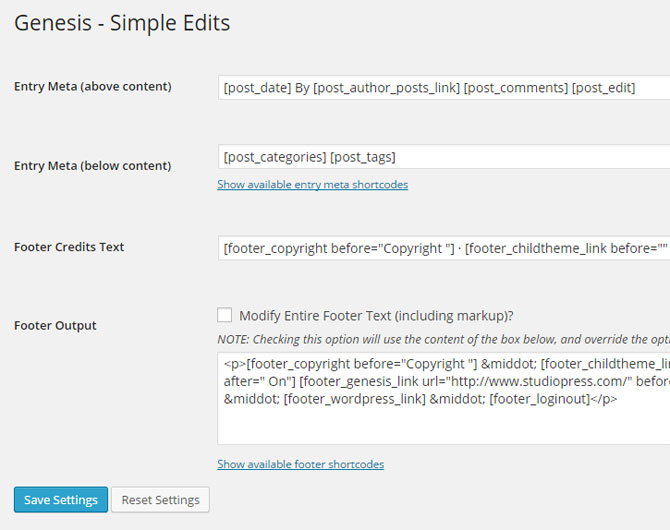
If you want to remove something, let’s say author name, then just remove the shortcode from the admin screen. You can also change the order in which post meta is displayed, or use some additional shortcodes. The best part is that you can do this without learning PHP, or adding hooks and filters.
Add a logo to your Genesis theme
A professional looking site should definitely have a logo, instead of the site title. A good looking logo becomes the identity of your site, catches the reader’s attention, and also gives a professional look. So let’s learn how to add a logo to your Genesis child theme.
Firstly, check if your theme already has an option for logo image. Go to your WordPress dashboard > Appearance > Header. If your theme supports custom header, then that’s the place from where you can insert an image logo to your site. However, if there’s no such Header option available, then read on.
For the purpose of this tutorial, I will be using the sample child theme of Genesis Framework. If you open the style.css of the child theme, then you will notice this code.
.header-image .site-title > a {
 background: url(images/logo.png) no-repeat left;
 float: left;
 min-height: 60px;
 width: 100%;
}
As you can see in the above code, the logo is fetched from the images folder. All you need to do is to simply overwrite the default logo with your own one. Note that it should be named as logo and it should have .png extension.
Also ensure that you have selected “Image logo” from Genesis > Theme Settings > Use for site title/logo.
![]()
The default size of the logo is 360px width by 164px height. If you are uploading a logo with a different size, then you will need to adjust the CSS from your child theme’s style.css. In the above code, simply change the value of the height and width of the logo as per your requirement. You can also use Firebug, a browser add-on for Firefox and Chrome to inspect the element, find the exact CSS and even change the values on the fly.
Add social icons to sidebar
There are always two ways to do stuff in WordPress. You can either use a plugin to add that functionality/feature, or do some manual coding. Same applies to adding social icons to the sidebar in Genesis theme. Simple Social Icons a plugin that is a really neat, customizable and easy way to display social icons that links to various social profiles.
With this plugin, you just need to choose which social media profiles you want to link to and you can also customize the color and size of your icons. There’s also an option to choose the alignment of icons, be it left, right or center. All these settings can be performed right from the Widgets page. Those who like simplicity and minimalism would really love this plugin.
Change layout per page/post
Have you ever wanted to change the layout of the entire page/post? Let’s say you want the ‘About’ page to be full width with no sidebar, whereas you want the sidebar on regular blog posts. Now this can be easily achieved in Genesis, all thanks to the in-built functionality and you don’t even need to use any plugin. Here’s how you can have different layout for different pages/posts.
Firstly, go to Genesis > Theme Settings and select the default layout that you want on majority of pages. Next, visit the pages/posts that you don’t want the default layout, scroll down and you will find “Layout Settings” section. From there, select the layout that suits your page or post, be it left sidebar, right sidebar, full width or three column.

This option is many times overlooked by beginners, but now you know how to do this!
Add a subscribe or sign up box to sidebar
If you are starting a new blog or a business website, then chances are that you would want to add a subscription box to any widgetized area of your site, which is mostly the sidebar.
Genesis eNews Extended plugin allows you to add a subscription box, and it is compatible with many popular mailing or email marketing services like FeedBurner, MailChimp, AWeber, FeedBlitz and Constant Contact.
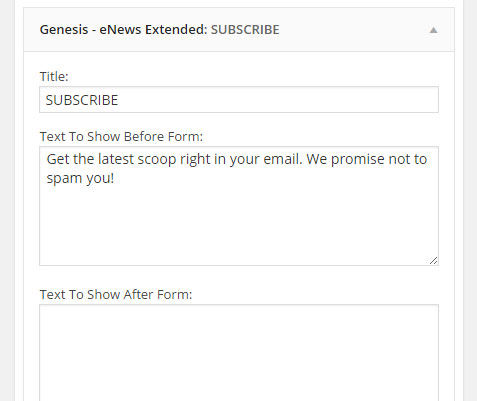
To get started, just install and activate this plugin. Next, go to Appearance > Widgets and drag and drop the Genesis eNews Extended plugin to any widgetized area of your choice. Configure the options in this widget and you are done! You will get a fully functional subscribe box within minutes in your Genesis theme using this method. Of course you would first need to sign-up with the email marketing service of your choice before using this plugin.
Add Google Analytics and other tracking code to Genesis Theme
Google Analytics is a free service by Google that presents detailed statistics related to visitors and your site. It provides useful data on visitors, such as total number of visitors, page views, country of origin, average time spent, most viewed pages of your site, keyword information, and such. So if you want to use Google Analytics, then first sign-up with a Google account. Next, sign-up with Google Analytics from here.
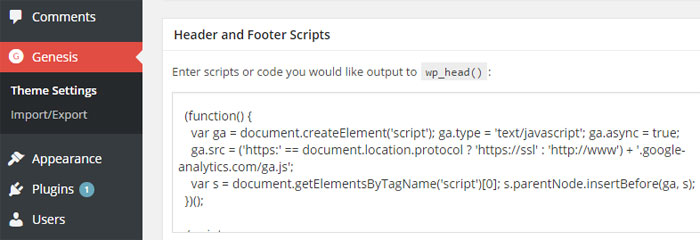
Fill out the required fields correctly and then you will get a tracking code. Copy that tracking code. Now go to WordPress dashboard > Genesis > Header and Footer Scripts and then paste the Google Analytics tracking code in here (as shown in the screenshot below). Click on the “Save Settings” button to save your new settings.
If you still get an error in Google Analytics saying “Status: Tracking Not Installed” then please wait for a few hours. Sometimes it takes more time for Google to detect the tracking code, but it will start working.
If you are not using Google Analytics, but want to use some other service like Statcounter then also the process is the same. Just add the tracking code in the same place.
Easily customize Genesis themes without touching the code
Not everyone can code, nor is everybody required to code. Let’s be honest, it’s not that easy. Therefore wouldn’t it be great if you can customize your Genesis theme without touching the code? Well, that’s possible with the help of a plugin.
Design Palette Pro is a plugin developed by Andrew Norcross which makes customizing Genesis themes super easy, no coding required. With this plugin, you can change various elements like theme color, fonts, images, backgrounds, margins, padding and much more.
This plugin basically generates a custom CSS file and does not replace any code or style inside your child theme itself. So if you are not familiar with coding and don’t want to hire a developer but still want to change the look of your site, then this plugin is what you should try.
Note that Design Palette Pro is not a website builder, and that’s why it doesn’t lets you to build custom layouts. It focuses on doing just one thing, and that is customizing the style of your Genesis theme, and that it does really well.
Translate Genesis Framework to other languages
If you can have WordPress in other languages, then why not Genesis framework? Fortunately, translating the Genesis Framework in your own language is as easy as installing a simple plugin and you don’t even have to mess with any .po and .mo files.
Before installing the plugin, go to Settings > General and select your language from “Site Language” menu. Chances are that you must have already done that, but if not, then do it now.

Now, install and activate Genesis Translations plugin. That’s all you need to do and this plugin will translate each strings in your language. There is no options page for this plugin. You will now be able to see the Genesis settings menu, posts and pages in the back-end in your own language.
This plugin supports languages like: Croatian, French, Danish, Swedish, Finnish, Bulgarian, Italian, German, Indonesian, Portuguese, Chinese, Japanese, etc.
Add WooCommerce to Genesis theme
If you are developing a site for selling something, be it a physical or digital product, then you might want to use WooCommerce for that purpose. It is one of the best plugins out there for ecommerce. Now, normally users would just install and activate the WooCommerce plugin for that. However, apart from that, users would also need to install another plugin named as Genesis Connect for WooCommerce, which will help you to integrate WooCommerce with your Genesis framework and child theme.
To know in detail, check out a separate article on how to add WooCommerce support to Genesis theme. In this article, you will find everything explained step-by-step.
So that’s it. Hope these tips and tutorials will help you to get the most out of your Genesis framework in the most simplest possible way ever.
This framework looks great. You can go into the code and customize it further or just go into the easy mode and customize things faster and easier.
Thanks Saqib!
Thanks for sharing.
As a beginner to Genesis, these tips helped me a lot.